Using the Issues Tool
The definitive user guide to Ninety's Issues tool.

Written by Tommy Mains
Updated at April 30th, 2025
-
 Insights
-
 Data
Data
-
 Rocks
Rocks
-
 To-Dos
-
 Issues
-
 Meetings
-
 Headlines
-
 Vision
-
 Org Chart
-
 1-on-1
-
 Directory
-
 Knowledge Portal
-
 Assessments
-
 Integrations
-
 Account Options and Troubleshooting
-
 Mobile
-
 Partner Hub
-
 Maz
Maz
Table of Contents
Using the Issues Tool
All Ninety users can view their team's Issues lists with the Issues tool . However, only licensed users can add Issues to a team's list.
Navigating the Issues Page
Navigating the Issues Page
Use the following filters to sort through Issues effectively:
- Short-Term or Long-Term Issues
- Team dropdown
- Archive toggle
- Search bar
Issues Page
The Issues tool first organized by teams and then by Issue type. The Short-Term and Long-Term tabs bring you to a unique page with separate Issues lists for either your team's immediate or long-term planning.
Switch between each tab to view your team's Issues lists.
- Short-term Issues are typically addressed during Weekly Team Meetings or during 1:1s between leaders and team members.
- Long-term Issues are strategic in nature and discussed during Quarterly or Annual Planning. These may become future Rocks, Key Topics, or remain on the list until the team is ready to tackle them.
Team Dropdown
Archive Toggle
Click the Archive Toggle on to view your team's archived Issues.
Search Bar
Use the search bar to quickly find Issues.
Issues Page Organization
The Issues page typically consists of a single list of Issues. If Issues are sent to your team or if you send Issues to another team, they are shown on separate lists.
The top of each Issues list displays the Issue type (short- or long-term), the total number of Issues the team has raised, and two options for how the Issues are laid out.
List Views
There are two ways to display your Issues:
- List View — Displayed as an icon with three vertical bullet points, each followed by a horizontal line.
- Column View — Displayed as six horizontal lines organized in a borderless table that’s two columns wide and three rows tall.
You can select which view you want from the top right of the Issues list (but below the Filters bar and tabs (Short-Term, Long-Term) row.
Reorganizing and Sorting Issues
Each Issues list has several ways to help users organize their Issues. Click on any of the following filters to sort the list in ascending or descending order:
- Title — the name of the Issue.
- Ranking (#) — the priority ranking of the Issue (1-5).
- Created — the date (month, day) the Issue was created.
- Owner — the licensed user who owns the Issue.
Owning an Issue means that the owner can ultimately decide when the Issue is solved/resolved.
Creating Issues
Creating Issues
Issues are the problems, obstacles, ideas, or opportunities teams discuss and solve during meetings. Our Issues tool captures and stores your team's short- and long-term Issues.
- Short-term Issues are discussed and solved during weekly team meetings.
- Long-term Issues are prioritized, discussed, and solved during quarterly and annual team meetings.
Tip: Use our ![]() Insights tool to track your team's Issue completion rate and more.
Insights tool to track your team's Issue completion rate and more.
Video Overview
Creating Issues in Ninety
There are three ways to create a new Issue in Ninety:
- Using the global Create button
- From your team's page in the Issues tool
- As a Linked Issue from another item
Using the Create Button
You can create new Issues from anywhere in Ninety using the Create button on the top right of the page or in the Issues tool.
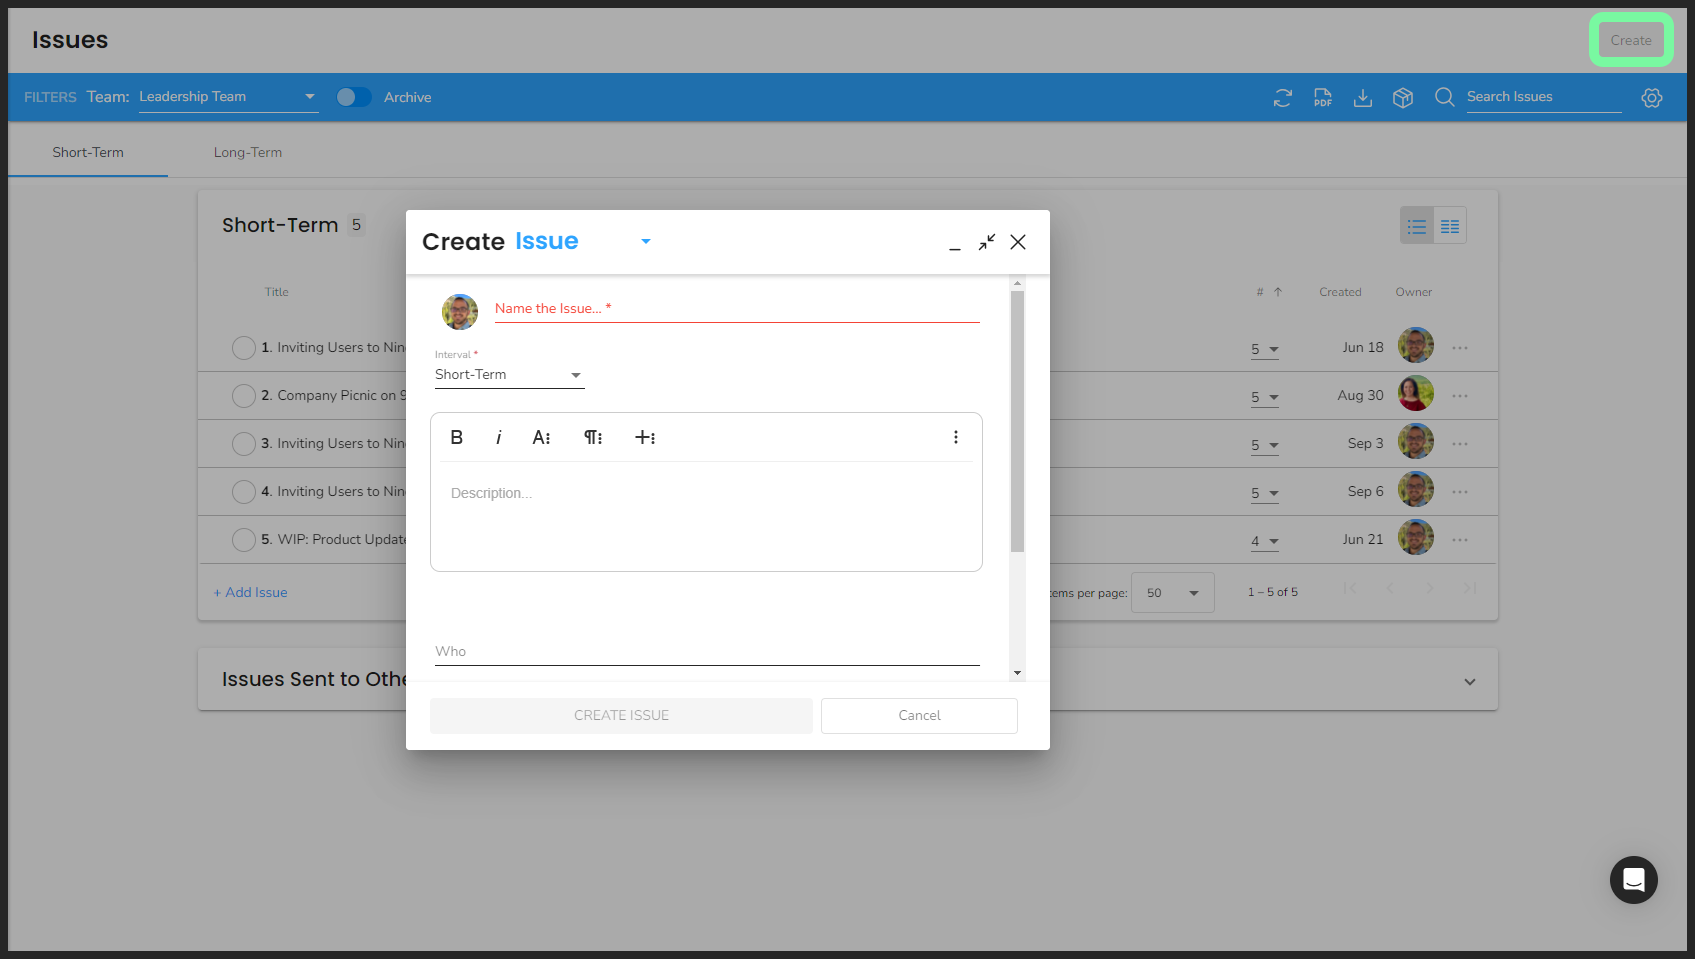
To create a new Issue with the Create button:
- Click Create on the top right of any page.
- Use the dropdown to ensure Issue is selected.
- Write a title for the Issue.
- Choose a team from the Team dropdown.
- Click Create Issue.
While creating Issues, you can also:
- Switch the person bringing the Issue to the team by clicking the profile image and selecting another user.
- Make it a long-term Issue by clicking the Interval dropdown and selecting Long-Term.
- Write a description.
- Add a user to the Who section — this is the decision maker for the Issue.
- Give it a priority number from the Priority dropdown.
- Attach files by clicking the plus button next to Attachments.
Creating in the Issues Tool
To create a new Issue from your team's page in the Issues tool:
- Click Issues from the left navigation.
- Select the Short-Term or Long-Term tab.
- Click + Add Issue at the bottom of the Issues list.
- Write the Issue's title and press Enter or click the checkmark.
- Click on the Issue's row to open its details panel to edit its content.
- Use the details panel to:
- Assign the user who is raising the Issue
- Edit the title
- Add a description
- Apply a priority number
- Add a user to the Who section — this is the decision maker for the Issue
- Choose which team should discuss the Issue with the Team dropdown
- Send the Issue to another team to discuss by clicking the paper airplane icon and selecting a team
- Add attachments and comments
Creating Linked Issues
Linked Issues show the item(s) it's linked to in the Linked Items section of its details card.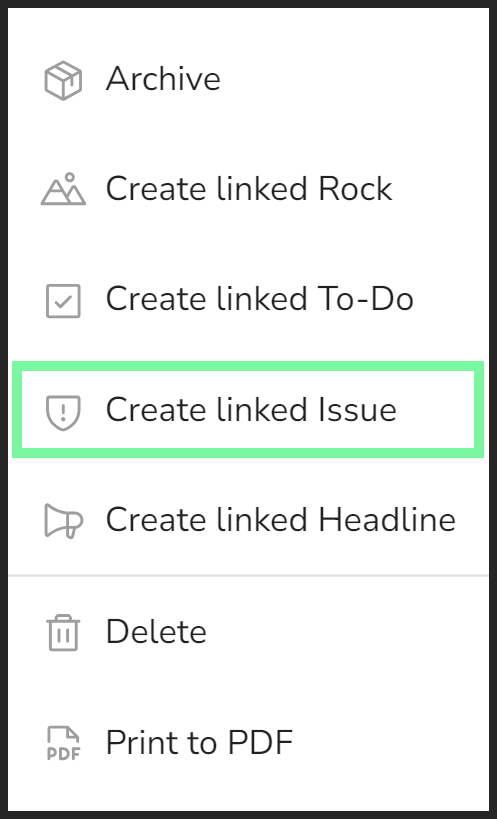
You can create a linked Issue from an existing item in Ninety (such as a Rock, To-Do, Issue, or Headline) during a meeting or by navigating to the corresponding tool from the left navigation.
To link an existing item to a new Issue:
- Right-click the item's row.
- Click Create Linked Issue from the dropdown.
- Edit details as desired from the popup.
- Click the Create Linked Issue button.
To unlink an item from an Issue, the user assigned to the Rock should:
- Click Issues from the left navigation.
- Click the Issue to open its details panel.
- Scroll down to the Linked Items section and click Edit.
- Click Unlink.
Tip: Enter Your Issues Before Your Next Meeting
Entering Issues before your next meeting is crucial for several reasons:
- Improved meeting flow: Adding well-described Issues beforehand keeps the meeting running smoothly.
- Efficient prioritization: Preliminary ranking helps streamline the discussion process.
- Enhanced clarity: Accurately identifying and thoroughly clarifying Issues increases the chances of resolution.
- Focused discussions: Well-prepared Issues reduce the likelihood of conversations veering off path.
- Time-saving: Capturing Issues as they arise throughout the week saves valuable meeting time.
By entering Issues beforehand, your meetings will be more focused, productive, and aligned with their intended purpose.
Managing Your Issues Lists
Keeping your Issues lists up-to-date and organized helps teams stay productive both in and out of meetings. You can do the following to quickly manage your Issues lists:
- Toggle between list and column view with the buttons on the top right of the list.
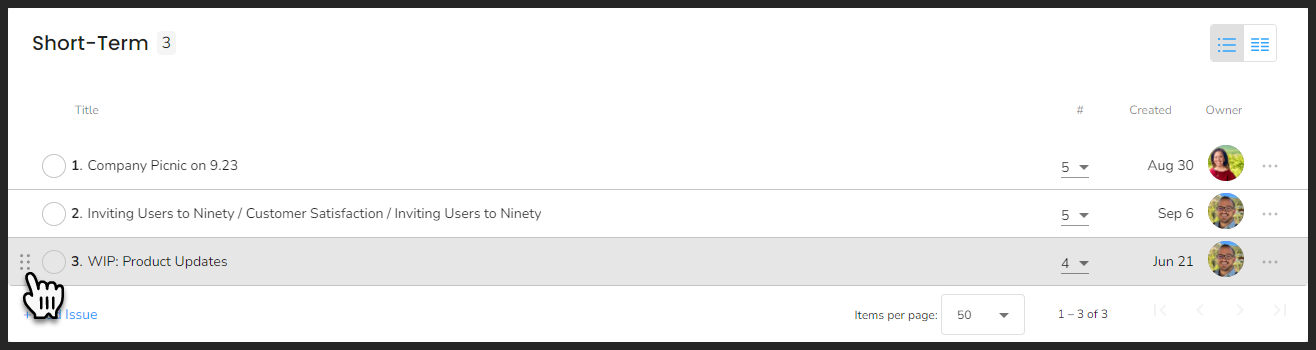
- Drag and drop Issues into a new order by hovering over the far left of an Issue's row and then clicking and dragging the six-dot icon.
-
Sort all issues alphabetically, numerically (by priority number), chronologically (by created date), or individually (by Issue owner) by clicking any of the following at the top of each column, respectively:
- Title
- #
- Created
- Owner
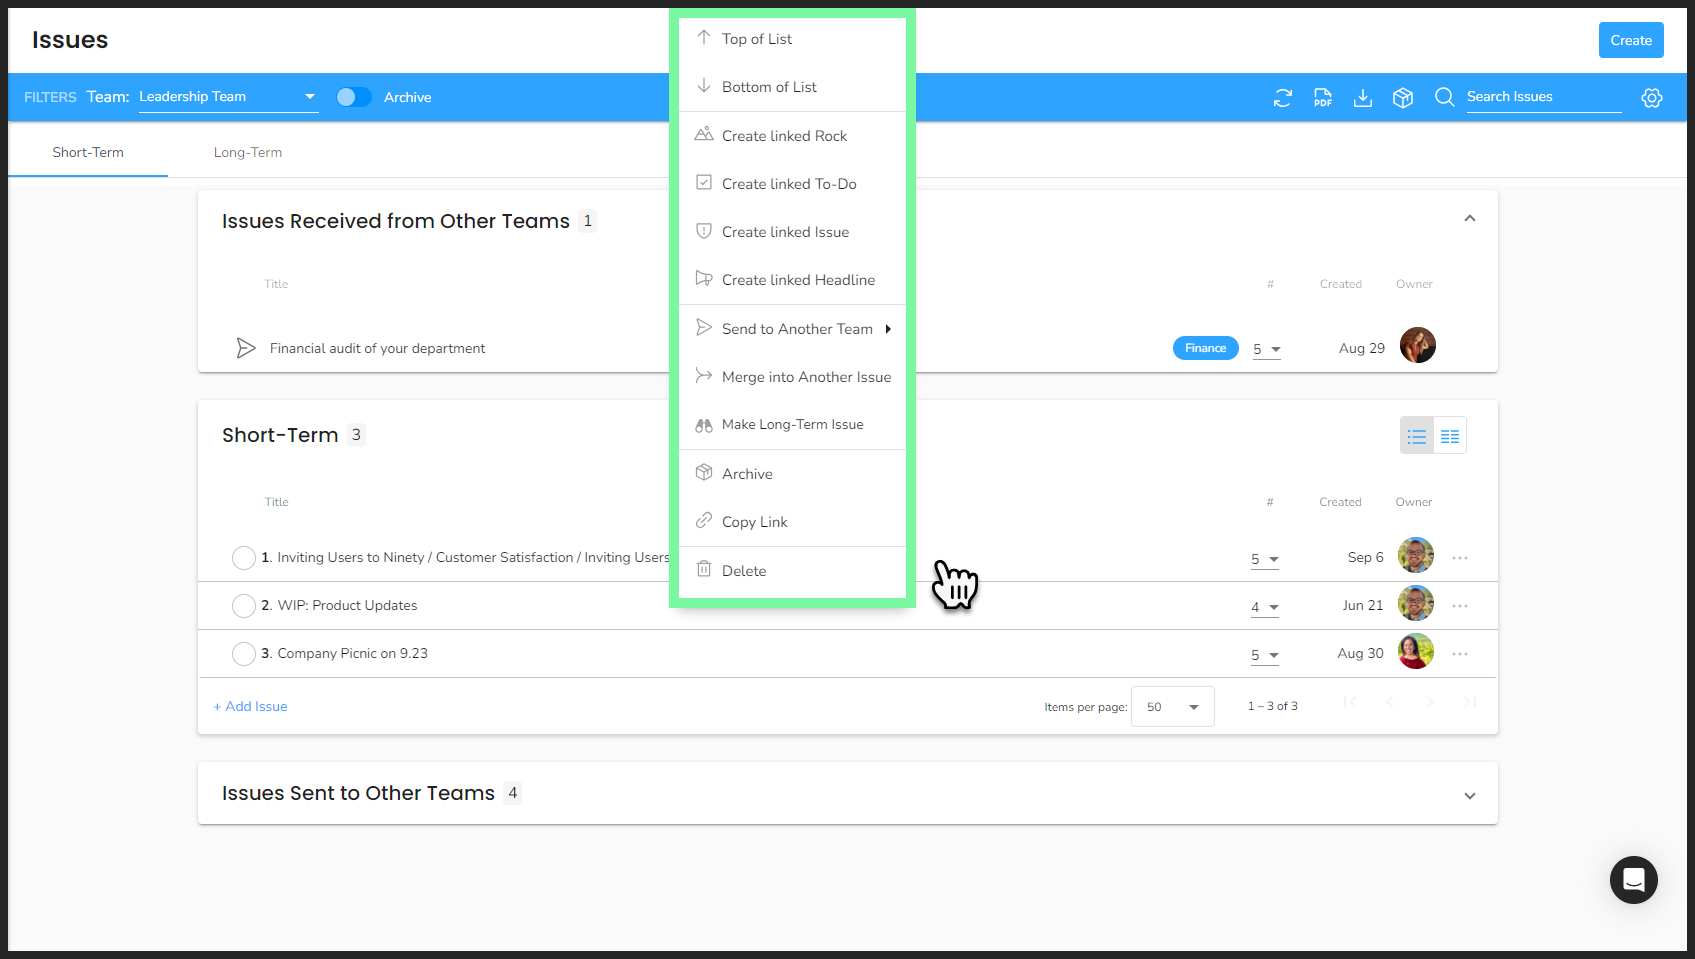
Right-click any Issue on one of your team's lists to open a dropdown of additional ways to manage your Issues, including:
- Top of List — Move this Issue to the top of the team's list.
- Bottom of List — Move this Issue to the bottom of the team's list.
- Create linked Rock — Create a Rock using this Issue's title and description.
- Create linked To-Do — Create a To-Do using this Issue's title and description.
- Create linked Issue — Create a new Issue using this Issue's title and description.
- Create linked Headline — Create a Headline using this Issue's title and description.
- Send to Another Team — Move this Issue to another team's list.
- Merge into Another Issue — Transfer all of this Issue's information to another Issue on the list (the user will click the Issue to merge with).
- Make Long-Term Issue/Make Short-Term Issue — Move this Issue to the same team's opposite list.
- Archive — Move this Issue to your team's Issue archive.
- Copy Link — Copy a link directly to this Issue's details card to your clipboard.
- Delete — Delete this Issue from your list (it will not be archived).
Editing Issues
Editing Issues
Raising Issues for discussion is an essential step for teams to collaborate and act on the problems, opportunities, blockers, and questions preventing them from getting work done. To ensure your team finds effective solutions while discussing Issues, team members should add context and notes to their Issues in Ninety.
How to Edit Issues
You can edit any Issue on your team's Issues list by opening its details card. To open an Issue's details card, click the Issue's row. 
To edit, add to, or modify an existing Issue, follow these steps:
- Click Issues from the left navigation.
- Locate the short-term or long-term Issue you'd like to edit.
- Click the Issue's row to open its details panel.
-
Use the details panel to update various aspects of the Issue, including its:
- Owner: the person raising the Issue.
- Title: a clear, brief explanation of the Issue.
- Description: the needed context for discussion, notes from team members, and what needs to be done to call the Issue solved.
- Priority: a ranking 1-5 indicating how necessary the Issue is to discuss during the next meeting.
- Who: an optional field to designate a team member who may be the ultimate decision maker to resolve the Issue.
- Team: the team that created the Issue.
- Public Issue: For most teams, all Issues are set to public; private teams can have private Issues; and the designated Leadership Team can choose whether or not their long-term Issues are visible to the rest of the organization.
- Attachments: Upload new files or delete outdated ones related to the Rock.
- Comments: Add comments to provide updates or communicate with team members.
Changes made to an Issue's details panel are saved automatically.
Issue Type
You can easily move Issues between your short and long-term lists. Simply right-click the Issue's row or click the ellipsis at the top of its details panel and select Make Short-Term Issue or Make Long-Term Issue, respectively.
Prioritizing and Ranking Issues
Prioritizing and Ranking Issues
Issues are the heart of our team meetings. We join together to Raise, Discuss, and Resolve (RDR) the Issues most pertinent to our responsibilities for the week, quarter, or year.
We recommend ranking your Issues as you create them and reviewing the Issues you've raised before your next meeting.
Methods of Prioritization
We have four primary ways to prioritize Issues during a meeting:
- Ranking 1-5
- Top 3 selector
- Drag and drop
- Issues Voting
Incorporating one or more of these strategies helps keep meetings focused on simplifying the work that needs to be done.
Ranking Issues 1-5
A user can rank an Issue while creating it by selecting a 1-5 in the Priority field.
The 5s take precedence during a meeting. If there's remaining time after covering these Issues, the team will continue the RDR process.
- 5 = Must solve today
- 4 = Will ideally solve today
- 3 = Solve today if we have time
- 2 = Don’t need to solve the Issue today, but should solve it soon
- 1 = Not an urgent Issue, but it would be good to solve it near-term
Select the # symbol to order the Issues according to their prioritization number.
If an Issue isn't ranked before the meeting, have the Issue's owner assign a number at the start of the Issues segment of the meeting.
Top 3 Selector
Use the Top 3 Selector during a meeting to quickly choose the top three Issues to discuss during a meeting.
- Click the 1, 2, 3 list icon on the top right of the Issues card.
- Click the Issue that should become the number one Issue for the team.
- Repeat for the second Issue.
- Repeat for the third Issue.
After the third click, the Issues will be reorganized to bring the selected three Issues to the top of the list.
Drag and Drop
During meetings, the facilitator or the team member operating Ninety's platform can drag and drop Issues into a preferred order by clicking and holding the 12-dot grid on the far left of an Issues row (hover over this area for the grid to appear). After dropping the Issue, Ninety will automatically re-number the team's Issues.
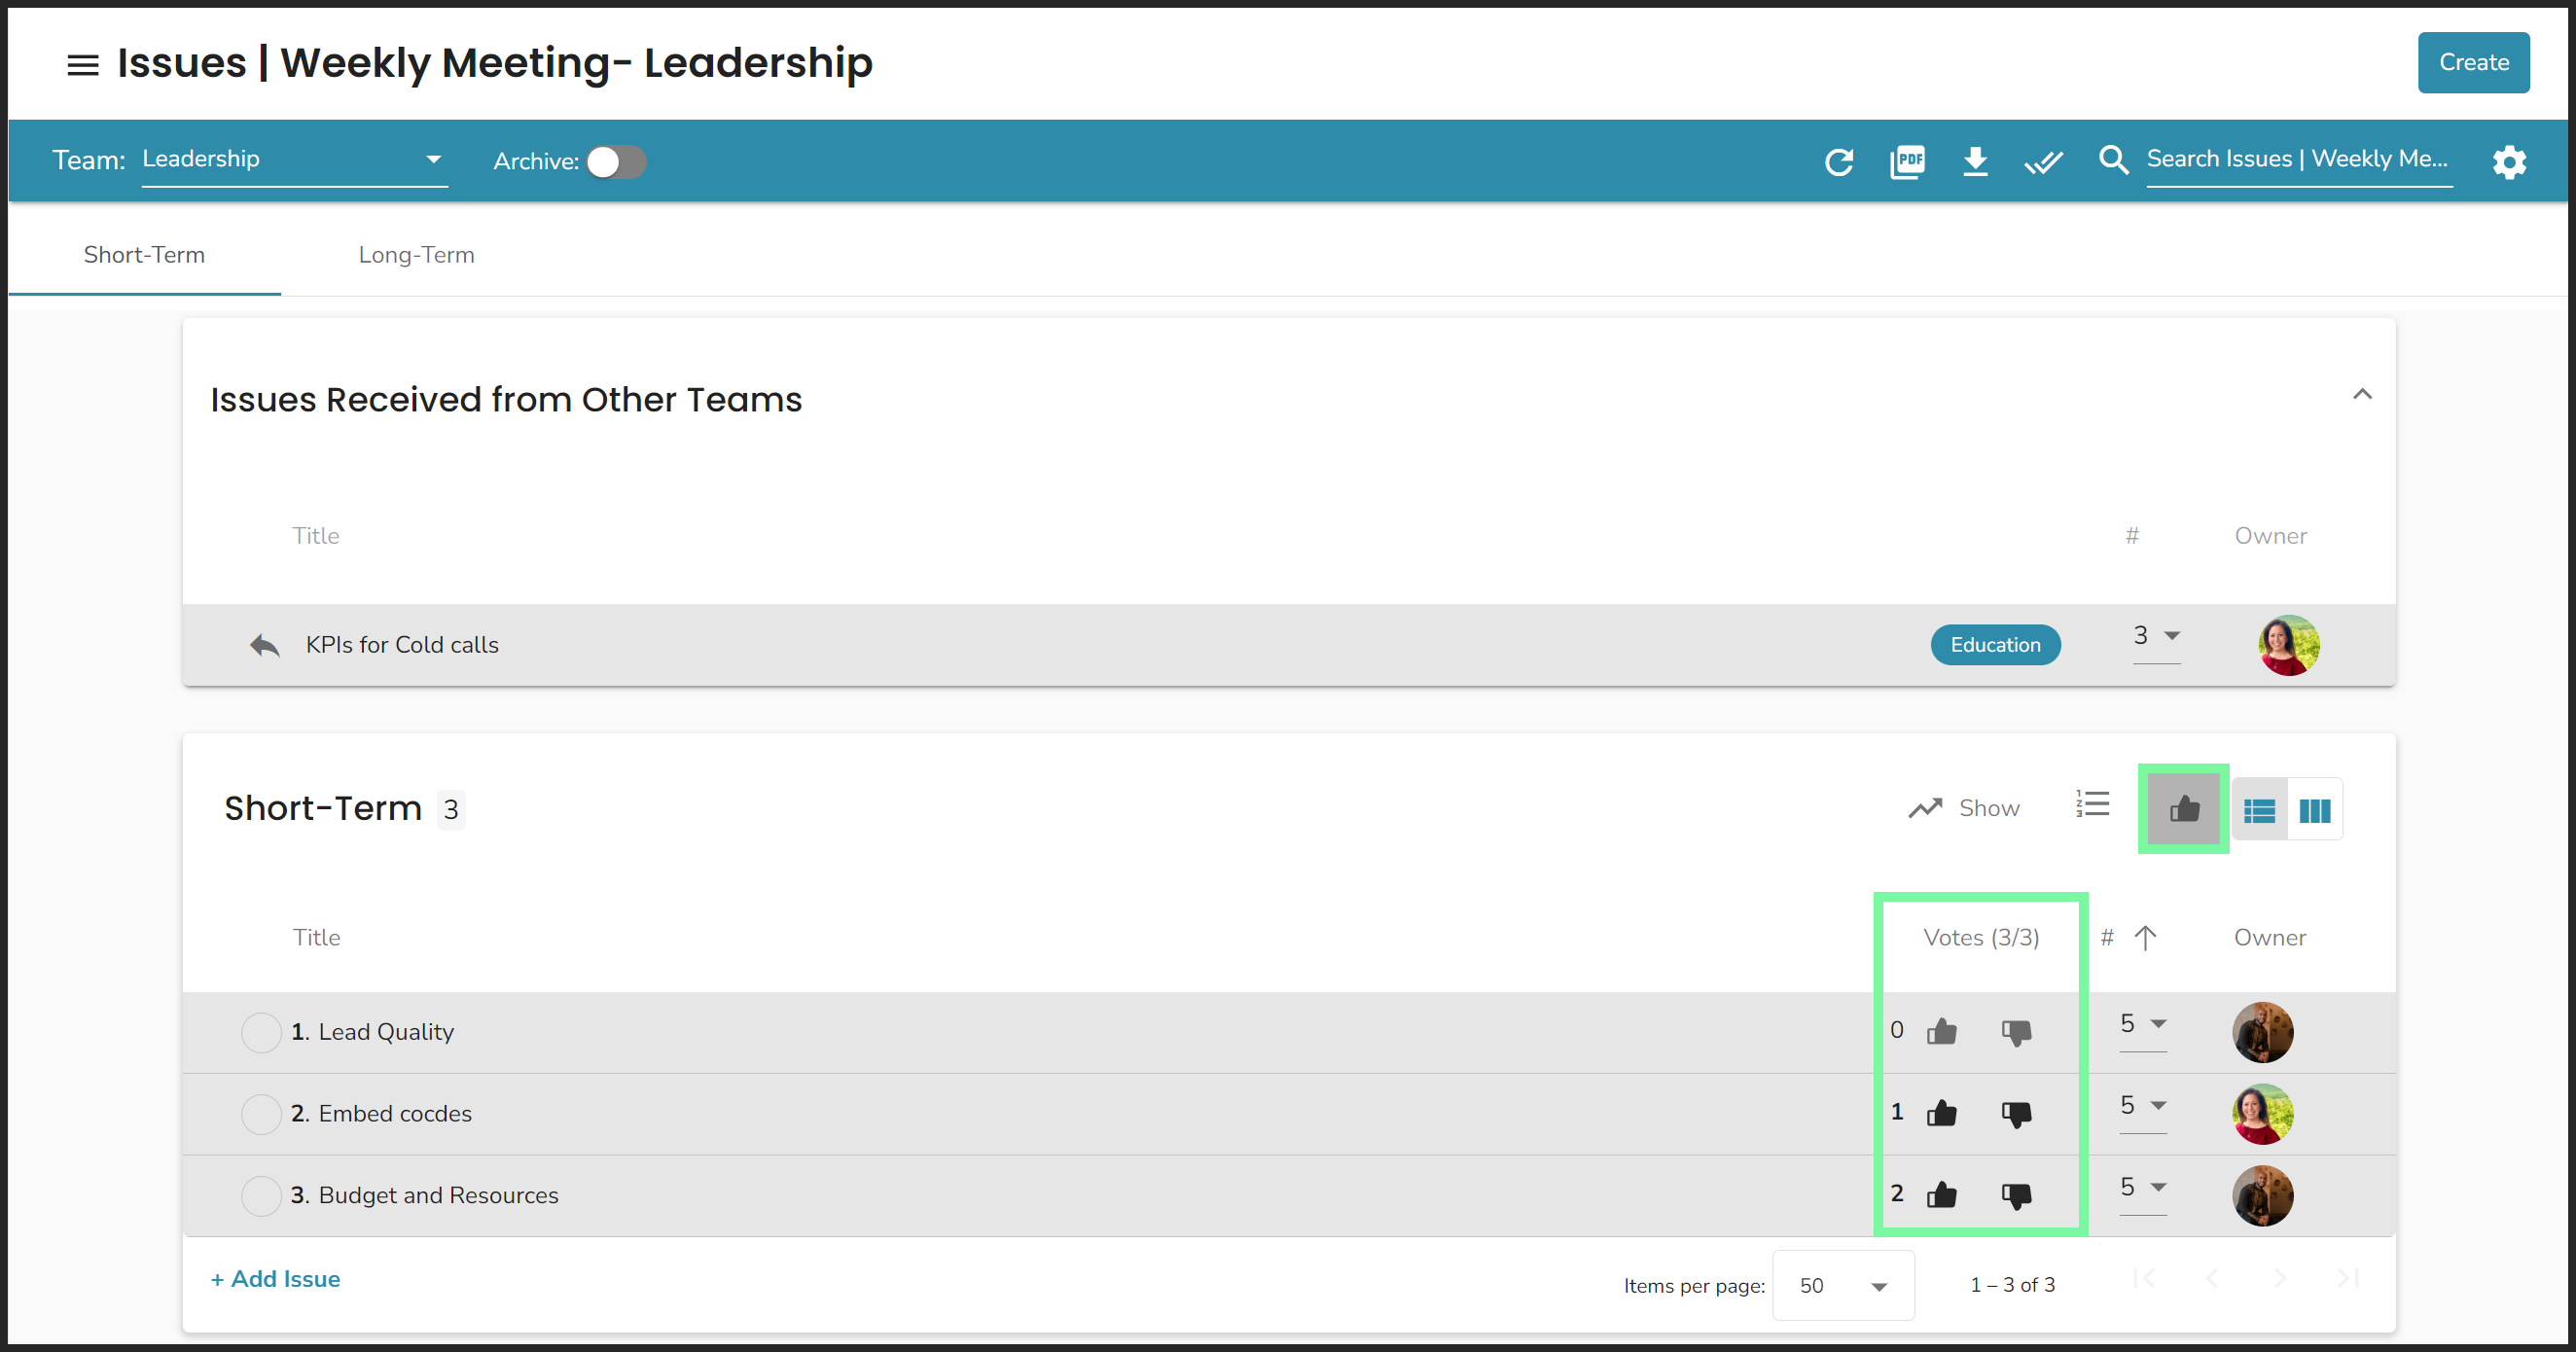
Issues Voting
Issues voting is an optional company feature used in meetings to allow teams to quickly vote on which Issues should be prioritized to solve in a meeting.
To turn on Issues Voting, an Owner or Admin should:
- Click their name from the bottom of the left navigation.
- Click Company Settings.
- Scroll down to the Issues Feature Controls.
- Click the Voting toggle on.
To initiate Issues Voting in a meeting, click the thumbs-up icon on the top right of the Issues card.
Then, each team member uses their three votes by clicking the thumbs-up on the Issue(s) they wish to discuss. To remove a vote, click the thumbs-down.
Helpful Resources
🔵 Learn more about how we recommend solving Issues from the 90u Library.
🟠 Looking for EOS® information on IDS® and solving Issues?
Sending and Receiving Issues Between Teams
Sending and Receiving Issues Between Teams
Every team in Ninety can raise Issues, but not every team is equipped to discuss and solve their Issues. Your team's Issues lists are located in our Issues tool. When another team sends an Issue to your team, it will appear on a separate list above yours. When you send an Issue to another team, a new “Sent to Other Teams” Issues list appears below your Issues list.
Any licensed user can send a short-term or long-term Issue from their team's list to another team's list.

Sending an Issue to Another Team
To send an Issue to another team:
- Click an Issue to open its details panel.
- Click the paper airplane icon by the originating team's name.
- Choose a new team from the options shown.
The team that sent the Issue can still create linked To-Dos and update the Issue's description, but they cannot solve, archive, or delete it until it is sent back from the receiving team.
The receiving team has complete control over the Issue's status until it is sent back to the originating team.
Receiving an Issue from Another Team
Issues received from another team are shown on their own card above your team's Issues list.
When the team who received the Issue has finished discussing and resolving the Issue, they should click the paper airplane icon to return it to your team with any notes added to the description or as a comment. You'll also be able to see if they created any linked items in the Issues details panel. The comments section automatically documents the trading log of the Issue.

Archiving and Deleting Issues
Archiving and Deleting Issues
The Issues tool's archive saves all your team's completed or archived Issues in one central location. You can review your team's archived Issues at any time by clicking the Archive toggle.
Archiving Issues
Arching completed or irrelevant Issues keeps your lists clean and organized between meetings. The steps to archive one or more Issues are the same for short or long-term Issues.
Archiving an Issue
Any licensed user can archive an Issue by following these steps:
- Click Issues from the left navigation.
- Right-click the Issue or click the ellipsis at the end of its row.
- Select Archive from the dropdown.
You can also archive an Issue from its details panel by clicking the ellipsis at the top of the panel and selecting Archive.
Bulk Archiving Completed Issues

Users with Manager or higher permissions can archive all Issues marked complete.
To archive all completed Issues:
- Click Issues from the left navigation.
- Click the storage box icon on the Filters bar.
- Click Archive on the popup to confirm.
Restoring Archived Issues
To restore an archived Issue:
- Click Issues from the left navigation.
- Select the intended team from the Team dropdown.
- Click the Archive toggle on.
- Right-click the intended Issue.
- Select Unarchive from the dropdown.
Deleting Issues
Deleting an Issue permanently removes it from your workspace and the archive. Any licensed user can delete an Issue.
To delete an Issue:
- Right-click the intended Issue.
- Select Delete from the dropdown.
Since deleting a Issues permanently removes its data, we recommend archiving unwanted or cancelled Issuess instead.
Customizing Your Issues Tool Through Settings
Customizing Your Issues Tool Through Settings
Users with the role of Manager or higher can customize their team's Issues tool to fit how they operate.
Accessing Issue Settings
To access your team's Issue settings, click the gear icon (![]() ) on the far right of the filters bar. Only users with the proper permissions can view and change these settings. If you don't see the gear icon, you don't have the proper permissions and should contact your manager.
) on the far right of the filters bar. Only users with the proper permissions can view and change these settings. If you don't see the gear icon, you don't have the proper permissions and should contact your manager.

Use the Issue Settings window to turn on or off the following:
- Prioritization — the ability for team members to assign a priority value to their Issues to denote how important it is to discuss and solve in the next team meeting.
- Voting — the ability to allow all team members who have joined a meeting through Ninety to cast up to three votes on the Issue(s) to discuss next.
- Desired Solve Rate — the ability for your team to set their desired solve rate for Issues; review your team's Issue-solving performance in the Insights tool or the Past Meetings page.
Account-Wide Issues Settings
In Company Settings, users with the roles of Owner, Admin, or Coach can turn on or off two of the above features for the entire account.
Exporting Issues to a Spreadsheet
Exporting Issues to a Spreadsheet
Exporting your Issues from Ninety allows you to maintain offline records, share progress with stakeholders, and analyze your goals outside the platform. Follow the steps below to export your Issues effectively.
Exporting Issues to an XLSX File
To export one of your team's Issues into an XLSX spreadsheet:
- Click Issues from the left navigation.
- Select the appropriate Team using the dropdown.
- Click the Download icon (
 ) on the far right of the filter bar.
 - Save your file.
Exporting Archived Issues
To export archived Issues, click the Archive toggle on before completing the above instructions.
The exported spreadsheet has one tab for short-term Issues and another for long-term Issues. Each tab includes the following information:
- Owner
- Title
- Description
- Type
- Priority
- Team
- Who
- Attachments
- Completed On (date)
- Link
- Create Date
- Archive Date
The exported sheet does not include Issues sent to your team from other teams.
Printing and Exporting Issues to PDF
Printing and Exporting Issues to PDF
Printing your Issues helps you maintain offline records, share progress with stakeholders, and analyze your goals outside the platform. This guide provides step-by-step instructions for generating and printing a PDF of your team's Issues.
How to Export Issues to a PDF
Follow these steps to download all Issues displayed on your team's page (either your short-term Issues or long-term Issues) as a PDF:
- Click Issues from the left navigation.
- Use the Team dropdown to choose the relevant team.
- Click the PDF icon (
 ) on the filters bar.
 - Choose the PDF's page orientation from the popup.
- Click Print.
How to Print the PDF
Once you have downloaded the PDF, follow these steps to print it:
- Open the file using a PDF viewer such as Adobe Acrobat, Preview (Mac), or a web browser.
- Go to file> Print or press Ctrl + P (Windows) / Cmd + P (Mac) to open the print dialog.
- Ensure the correct printer is selected.
- Choose the appropriate page size.
- Set orientation (Portrait/Landscape) based on the layout.
- Adjust margins and scaling if necessary for better readability.
- Click Print to complete the process.
To print a single Issue:
- Right-click the Issue.
- Click Copy Link.
- Paste the link in your web browser.
- Select Print to PDF from the dropdown.
- Press Ctrl + P (Windows) / Cmd + P (Mac) to open the print dialog.
How to Receive Notifications for Issues
How to Receive Notifications for Issues
You can easily set up notifications from Ninety to receive messages when someone comments on an Issue you're following.
Setting Up Event Notifications

To receive event notifications to your email:
- Click your name or profile icon and select Notifications from the popup.
- Toggle on your preferred options for receiving email notifications.
By configuring your notification preferences in Ninety, you can maintain awareness of your tasks and deadlines, fostering accountability and timely progress toward your goals.
Frequently Asked Questions (FAQs)
How do I turn a short-term issue into a long-term issue?
- Select Issues from the main navigation
- Chose the team your short-term issue is assigned to
- Select the More options dots next to the issue
- Chose Long-Term from the dropdown
How do I prioritize issues?
We have four primary ways to prioritize Issues during a meeting:
- Ranking 1-5
- Top 3 selector
- Drag and drop
- Issues Voting
Read our Help Center Article, Ranking and Prioritizing issues for step-by-step instructions.
What is an Issue?
Issues are problems, obstacles, ideas, or opportunities that teams discuss and solve together. You can create short- or long-term Issues for each of your teams in Ninety. Your short-term Issues list is reviewed for IDS during your weekly Level 10 team meeting. Long-term Issues list is reviewed during your team's next quarterly or annual meeting — these items don't have priority during your current quarter but could become a Rock or long-term goal when there's capacity.
How do I create an Issue?
To create an Issue:
1. Click the Create button on the top right of the page.
2. Select Issue from the dropdown at the top of the popup.
3. Write the name of the Issue — a short description of the identified problem, obstacle, idea, or opportunity.
4. Choose short- or long-term from the Interval dropdown.
5. (Optional) write a description to bring your team up to speed and begin discussion quickly.
6. Choose a team from the Team dropdown.
7. Select a priority.
8. Click Create Issue.
If you're creating the Issue for another user, click your profile image on the top left of the popup and select the correct user.
What's the difference between short- and long-term Issues?
Understanding how our platform differentiates short- and long-term Issues is a great step toward getting the most out of Ninety. The biggest difference between the two is when they go through the IDS® process.
Short-term Issues are the problems, obstacles, ideas, or opportunities to discuss and solve as a team during weekly meetings.
Long-term Issues, sometimes called LTIs, are items that don’t have priority this quarter, so you’ll discuss them during your next quarterly or annual meeting. Some of these become Rocks or stay an LTI until your team has the capacity to take it on.