Using the 1-on-1 Tool
A guide to using Ninety's 1-on-1 tool for meetings, quarterly reviews, annual discussions, and more.

Written by Tommy Mains
Updated at November 14th, 2025
-
 Insights
-
 Data
Data
-
 Rocks
Rocks
-
 To-Dos
-
 Issues
-
 Meetings
-
 Headlines
-
 Vision
-
 Org Chart
-
 1-on-1
-
 Directory
-
 Knowledge Portal
-
 Assessments
-
 Integrations
-
 Account Options and Troubleshooting
-
 Mobile
-
 Partner Hub
-
 Maz
Maz
Table of Contents
The 1-on-1 Tool
The ![]() 1-on-1 tool contains our people management features, including:
1-on-1 tool contains our people management features, including:
- Quarterly Reviews
- Annual Reviews
- Fit Check reviews
Each of these features has its own page; learn more below.
Quarterly and Annual Reviews
Quarterly and Annual Reviews
The primary use of the ![]() 1-on-1 tool is to facilitate quarterly or annual discussions between a leader and a team member. Watch the video below for an overview.
1-on-1 tool is to facilitate quarterly or annual discussions between a leader and a team member. Watch the video below for an overview.
Annual or Quarterly Reviews require the following:
- The manager creates the Review.
- Both parties fill out the forms prior to the scheduled meeting.
- The manager starts the meeting in Ninety to see both responses in a side-by-side view.
- The Review is signed and completed.
All discussions and answers are saved indefinitely within Ninety. They can also be printed out through PDF.
Role Permissions
- Owner, Admin, and Coach — Can see all Reviews in their company. Can create Reviews for any team.
- Manager — Can see all Reviews they're a part of. Can create (or delete) Reviews for their team.
- Team Member — Can see all Reviews they're a part of. Can create discussions. Cannot view all company discussions, or discussion settings.
- Observer — Does not see the 1-on-1 tool.
Creating a Review
Creating a Quarterly or Annual Review in Ninety kicks off the whole review process — once created, both the Manager and Team Member are notified and can begin filling out their forms.
Anyone can create a Quarterly or Annual Review between two people. This means assistants, HR professionals, meeting facilitators, and others can quickly set up a review between any Ninety users in the company.
- Navigate to the 1-on-1 tool and click the Quarterly Reviews or Annual Reviews tab.
- Click + Create Review (or + Quarterly Review in the upper right if reviews already exist).
- On the Overview tab, title the review and add an optional description.
- Choose a Time Period date range to pull in the managee's Rocks, To-Dos, and KPIs.
- Set a Due Date for both parties to complete their forms before the meeting.
- Confirm the Manager — this defaults to the user creating the review.
- Add managees using one of these options:
- Click Select All My Direct Reports to add all of your direct reports at once. Ninety will create a separate review for each person selected.
- Click Add Managee(s) to add individual team members one at a time.
- For each managee, select their Seat from the dropdown. If a managee holds multiple seats, choose the seat most relevant to this review.
- Click the Settings tab to adjust any review-specific settings before creating.
- Click Create Review. Ninety sends a notification email to both the Manager and each Managee.
Note: Only the participants listed in a review can complete its forms.
Preparing the Forms
After creating the Review, you can click Start Form or Edit Form on the right of the screen to see the status of all forms for the Review. For more information on how to edit the questions and options within the form, read “Configuring Lead, Agree, Coach (LAC) Commitments and Annual Questions.”
The Team Member assesses their performance and then their Manager's. The Manager reviews their performance and then the Team Member's.
- Click Start Form.
The first section assesses the Team Member on the company's Core Values, their Competency, Commitment, Capacity for the Seat, and their performance data on Rocks, To-Dos, and KPIs from each of their teams. - Next, the Manager is assessed. Ninety uses the Lead, Agree, Coach assessment for Managers.
- Click Finish on the bottom left of the screen to submit your form, or click Save for Later to return to the form at a later date.
Once you hit finish, you can no longer edit a Review form.
Editing the Forms
Overview Tab
After you've created a Review, you have the ability to edit various fields related to the forms and meeting. For example, if you schedule the Due Date as March 10th, but one of the participants has a conflict, you can change that Due Date without having to delete the current Review and create a new one.
Editable Fields: Name, description, and due date (only the Manager can edit the due date).
Edits can only happen before the Review as a whole is complete. A complete Review can mean a meeting was held, or forms are complete (if a meeting isn't going to be held). The discussion becomes locked at that point.
Settings Tab
Accessible and viewable by both users, but only the Manager on the discussion can edit the settings.
- Before someone starts the form, all the settings can be edited.
- Once the discussion is started, these cannot be edited. You see the message "Review in progress, these cannot be changed."
Completing the Forms
- Click Save for Later to save your progress at any time.
- After completing the forms, click Finish.
- The other Review member sees that the form is complete.
- Even after completing, clicking the Pencil icon allows you to edit your responses.
- After completing the form, click the PDF icon to export and print responses.
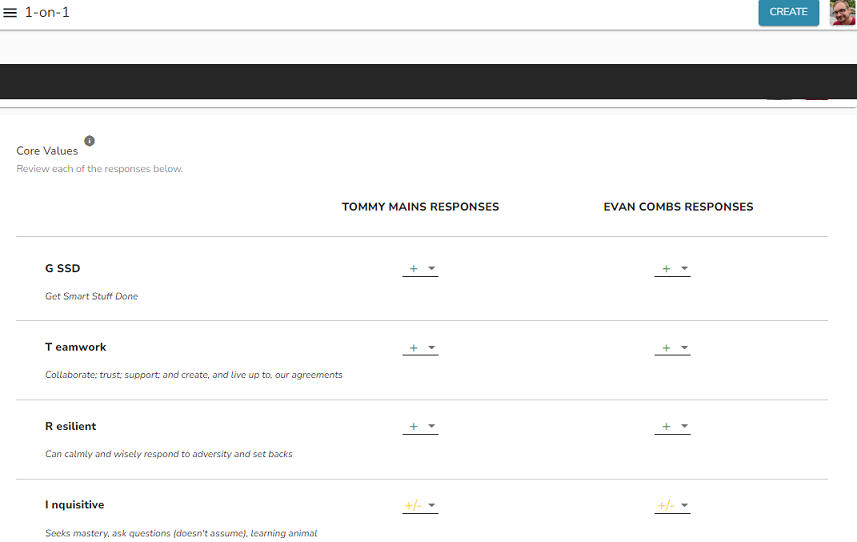
- Clicking on the Review opens the details panel on the right showing both parties' responses after the submission.
Holding the Meeting
After both parties have submitted their form responses, the option to Start Meeting displays. When started, the meeting shows a side-by-side comparison of the form responses.
Tip: Run the Review from only one person's computer. All entries are editable within the Review by either party.
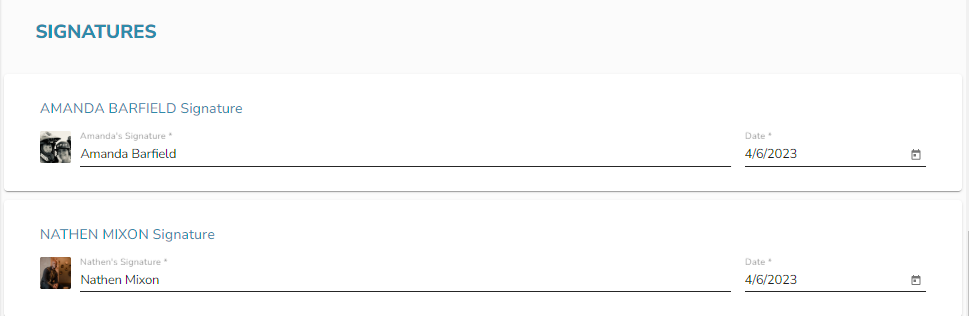
At the end of the meeting, each party electronically signs and dates the form — this step concludes the session. Users then mark the Review complete and archived.
Printing the Responses
After you complete the meeting, the responses are saved in Ninety.
You can also print the responses for your records:
- Click 1-on-1 from the left navigation.
- On the filters bar, toggle on Show Completed.
- Navigate to the Review you wish to print.
- Click the PDF icon next to the View Form link.
- Download the PDF and print it as needed.
Viewing Past Responses
- Click 1-on-1 from the left navigation.
- Choose either the Quarterly Reviews or Annual Reviews tab.
- Toggle Show Completed to on. This provides a list of all previously completed discussions, along with the following details and options.
- Manager name
- Team Member name
- Date it was completed
- PDF form — you can either view it here or you can print it out for your records
You cannot view past responses for deleted teams.
How to Delete a Review
To delete a scheduled review for any reason, the manager who scheduled the review should:
- Click the ellipsis at the end of the review's row.
- Click Delete from the options shown.
If the manager who created the review is no longer at your company, reach out to our support team to remove the review for you.
Customizing 1-on-1 Review Questions
Customizing 1-on-1 Review Questions
Commitments are the qualities, actions, and practices your organization's leaders agree to hold with their direct reports. We've categorized these into Leadership Commitments and Coaching Commitments as described in our leadership philosophy: Lead, Agree, Coach.
Admins, Owners, and Coaches can use the 1-on-1 tool to customize commitments and questions used in Reviews.
Any changes to commitments or Review questions are made for the whole organization.
Customizing the questions and commitments used in a quarterly discussion or annual review is a great way to keep these important conversations tailored to the participants. Users with Manager or higher permissions can customize Review settings through the 1-on-1 tool.
Review questions are always open-ended written responses in Ninety, while a simple Yes or No dropdown assesses commitments.
To edit a question or commitment on an annual review:
- Click 1-on-1 from the left navigation.
- Click the Quarterly Reviews or Annual Reviews tab.
- Click the gear icon on the far right of the Filters bar to open the Review Settings page.
- Click on an existing commitment or question to edit directly.
- (Optional) Click the plus sign on the commitments tab to create a new commitment.
- (Optional) Click “Add Question” on one of the questions pages to create a new question.
- Click the Save button when finished.
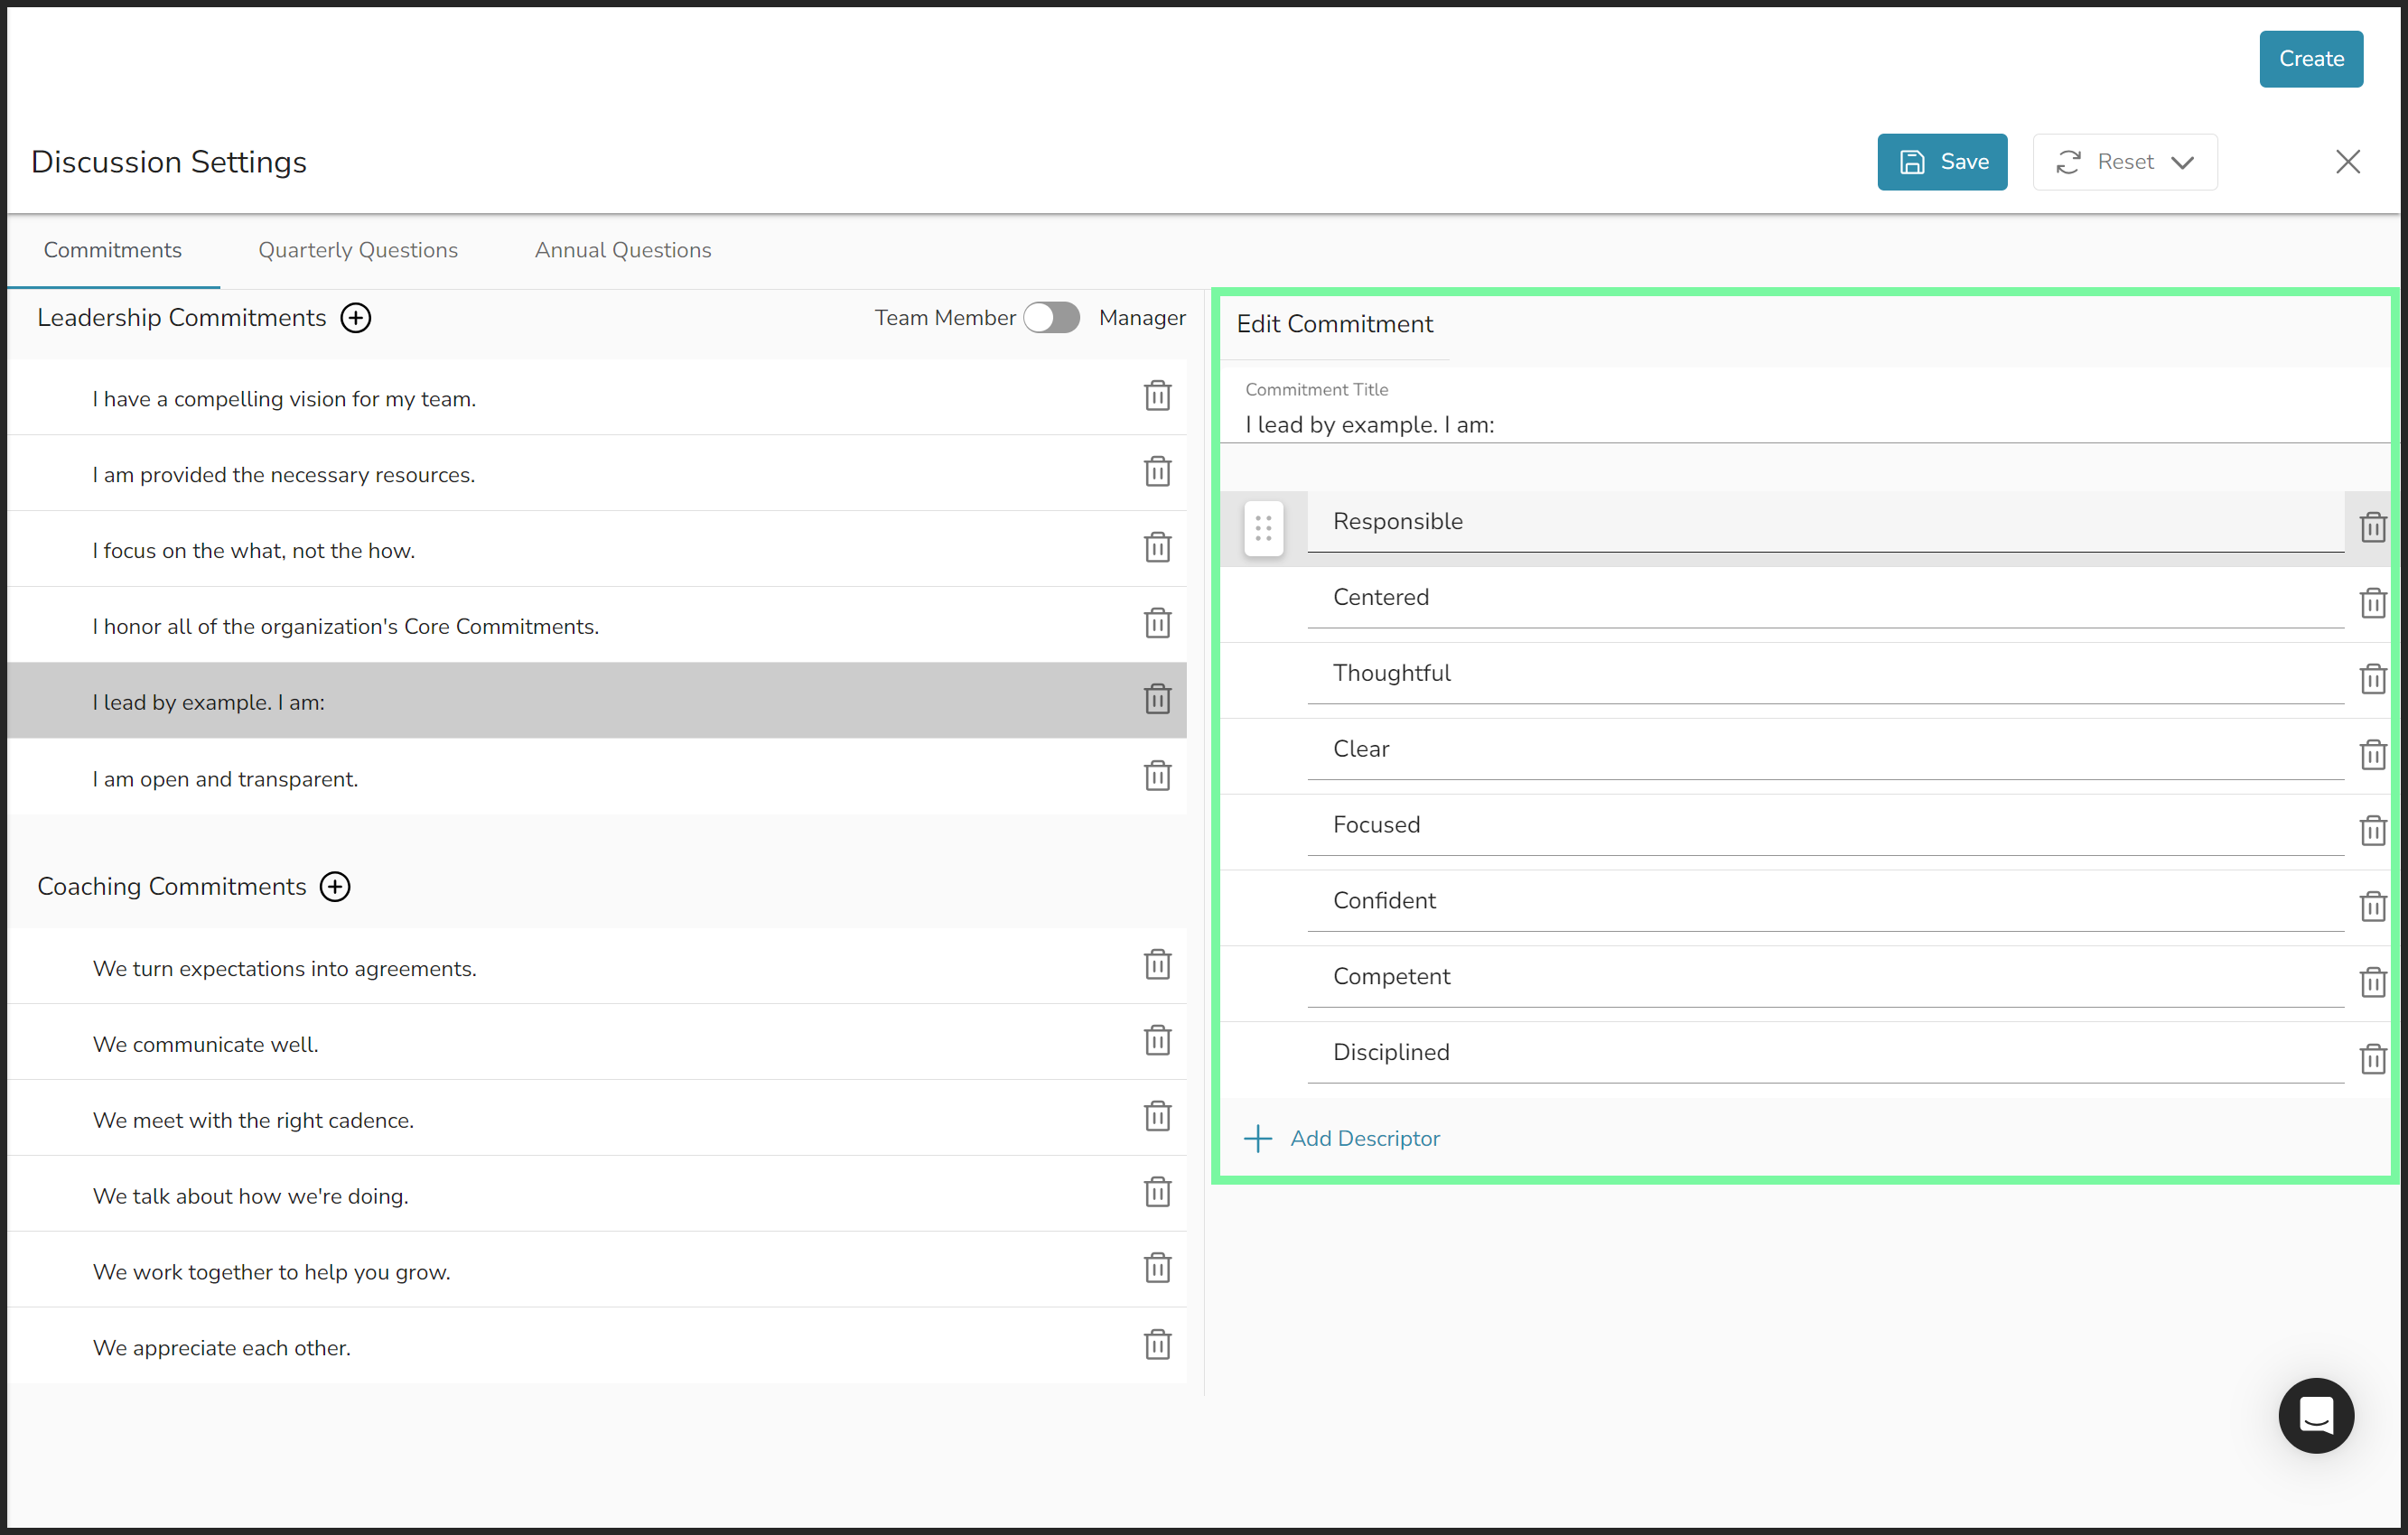
Creating and Editing Commitments
Access Review Settings by clicking 1-on-1 from the left navigation and then clicking the settings gear icon on the top right of the page to create new or edit existing commitments. Read through the tabs below to see what you can do from there.
Creating
New commitments are added to the bottom of their respective list. You can drag and drop commitments into your desired order.
- Click the plus sign next to either Leadership or Coaching Commitments.
- Click the new commitment called “Commitment Name.”
- Write a new title.
- Click Add Descriptor to add additional context (optional).
- Click the Save button.

Click the toggle to switch from how your team members and managers will read each commitment to increase how they'll be read and understood. You can edit the language of the same commitment in each view.
For example, the second default leadership commitment has different language for each user in a Review:
- Team members will read: “I am provided the necessary resources.”
- Managers will read: “I provide the necessary resources.”
Editing
Click any commitment to change its title and add or remove descriptors in the Edit Commitment panel.
Deleting
Click the trashcan icon on any commitment's or descriptor's row to delete it.
Organizing
Hover over and then click and hold the six-dots icon on the left of a commitment or descriptor to drag and drop items into your preferred order.
Resetting
Click Reset at the top right of the page to:
- Click Cancel Changes to remove any unsaved changes to your Review Settings.
- Click Reset to Default to remove every change you've made to Review Settings.
Both options result in permanent changes that cannot be undone.
Creating and Editing Review Questions
Access Review Settings by clicking 1-on-1 from the left navigation and then clicking the settings gear icon on the top right of the page to create new or edit existing Review questions. Then, click on the Quarterly Questions or Annual Questions tab. Read through the tabs below to see what you can do from there.
Questions for Quarterly and Annual Reviews are always open-ended, written responses.
Creating
- Click Add Question at the bottom of the current list of questions.
- Write the new question's Side Bar Link (this usually describes the category of the question).
- Write the new question's text.
- Click Save.

Editing
Click an existing question's Side Bar Link or Question text to access its text field.
Deleting
Click the trashcan icon on any question's row to delete it.
Organizing
Hover over and then click and hold the six-dots icon on the left of a question to drag and drop items into your preferred order.
Resetting
Click Reset at the top right of the page to either:
- Click Cancel Changes to remove any unsaved changes to your Review Settings.
- Click Reset to Default to remove every change you've made to Review Settings.
Both options result in permanent changes that cannot be undone.
Looking for our EOS-specific Help Center? Click here.
Completing a Fit Check
Completing a Fit Check

Use our 1-on-1 tool to complete Fit Checks.
To access the Fit Check page:
- Click
 1-on-1 from the left navigation.
 - Click the Fit Check tab.
- Click the Person dropdown to choose a team member.
- Click the user's row to view their completed Fit Checks.
- Click New Review to complete a new Fit Check for the team member selected.
User Role Permissions
Read this article to see permissions for each user role. Here's a brief summary of permissions for Fit Checks:
- Owner: Can view all completed Fit Checks. Can complete a Fit Check for any team member.
- Admin: Can view all completed Fit Checks. Can complete a Fit Check for any team member.
- Coach: Can view all completed Fit Checks. Cannot complete any Fit Checks.
- Manager: Can view all completed Fit Checks for users on their team(s). Can complete a Fit Check for any team member.
- Team Member: Can view all of their own completed Fit Checks. Cannot complete Fit Checks.
- Observer: Cannot view nor complete Fit Checks.
What Is a Fit Check
The Fit Check is Ninety's version of the People Analyzer. This feature allows you to conduct a one-way review on anyone in your Directory who is assigned an Org Chart seat. Use this to do a quick Core Values and Competency, Commitment, and Capacity (CCC) check. This one-way review is not meant to replace your Quarterly Review.
You see a list of all users in your Directory on the Fit Check page. Click New Review on a team member's row to complete a new Fit Check.
If a New Review button is gray, they are not assigned to a Seat on the Org Chart.
Completing the Fit Check

Select +, +/-, or - for each Core Value, which are pulled from your company's Vision page. Then select Yes or No for Competency, Commitment, and Capacity. Finally, click Save.
If the user you're reviewing is assigned to more than one Seat on the Org Chart, you'll need to select one of the Seats from the dropdown at the top of the Fit Check window before conducting the review.
Viewing Completed Fit Checks
Click on a user's row or select a user from the Person dropdown, and then click on their row to view all their completed Fit Checks.